EnglishSvenska

ODE solver in Python using custom Forward-Euler

Predator-Pray

For realtime simulation it is important to have an ODE solver that is simple enough. I did not find any plug-and-play kind of ODE solvers for realtime applications so I wrote one myself. The greatest benefit of this approach is that you have full control of every time step. Good for realtime simulations.

https://github.com/sebnil/Python-ODE-Forward-Euler/blob/master/Forward-Euler%20ODE%20solver.ipynb

It is very simple but show the basics of how to write an ODE solver. It could be extended to use more sophisticated solvers like Runge-Kutta or Crank-Nicolson.

Tagged with:

Trying some game development in Python

I wanted to learn some basic game development in OpenGL and Python. Pyglet is very good for this kind of thing. Unfortunately it seems to have a less active community compared to Pygame (but in my opinion Pyglet seems much more Pythonic in its design). My game will not win any awards since it is a Asteroids clone. But it has some other features like:

  • Bullets have recoil and will slightly accelerate the ship rearwards when shooting.
  • Game graphics from a professional artist. (nalishac.com)
  • When I started this list I thought there would be more features but I think this is it.

pyglet-asteroids on Github


Using a lot of code and inspiration from:

Code structure and inspiration from:

Tagged with:

Calculate Personal Financial worth with Python

I wanted to know how much my financial assets are worth across one or more bank accounts, so I created a small python script for it.

I just type all my assets into a list like this:

assets = {
    'AAPL': {
        'own': 40,
        'current_value': yahoo_share('AAPL')
    },
    'Coca-Cola': {
        'own': 35,
        'current_value': yahoo_share('KO')
    },
    'NOF': {
        'own': 170,
        'current_value': yahoo_share('NOF.OL')
    },
    'Nordnet Superfonden Sverige': {
        'own': 6.4099,
        'current_value': morningstar("http://www.morningstar.se/Funds/Quicktake/Overview.aspx?perfid=0P0000J24W")
    },
    'SEB Japanfond': {
        'own': 491.8263,
        'current_value': morningstar("http://www.morningstar.se/Funds/Quicktake/Overview.aspx?perfid=0P00000LU7")
    },    
}

Then I run the script and get an output looking a bit like this:
Skärmavbild 2015-09-12 kl. 13.40.51

(Not my actual positions 🙂 )

Next step is to program a get rich quick algorithm. Until then the code for calculating assets is published here:
https://github.com/sebnil/Pengar

Tagged with:

Python for sftp and mysql backup

I needed to backup some sftp sites and mysql from a remote server to my local server at home. Piece of cake in Python.

After that I add it as a Jenkins script to schedule periodic backups:

Skärmavbild 2015-05-05 kl. 23.18.45 jenkins_no_bg

import shutil
import os
import paramiko
import pysftp
import select

import logging

logging.basicConfig(level=logging.DEBUG)


def sftp_backup(ssh_host=None, ssh_username=None, ssh_password=None, source_directory=None, local_directory=None):
    with pysftp.Connection(ssh_host, username=ssh_username, password=ssh_password, log=True) as sftp:
        sftp.chdir(source_directory)

        # first remove the local directory to make room
        try:
            logging.info('Removing local directory: {}'.format(local_directory))
            shutil.rmtree(local_directory)
            logging.info('Done removing local directory: {}'.format(local_directory))
        except:
            logging.info('Can\'t delete {}. Probably does not exist'.format(local_directory))

        # then create the directory
        if not os.path.exists(local_directory):
            logging.info('Creating empty local directory: {}'.format(local_directory))
            os.makedirs(local_directory)
            logging.info('Done creating local directory: {}'.format(local_directory))

        # recursively copy to local_directory
        logging.info('Starging to download from {} to {}'.format(source_directory, local_directory))

        sftp.get_r('', local_directory)

        logging.info('Done')


def dump_mysql_to_file_via_ssh(ssh_host=None, ssh_user=None, ssh_password=None, mysql_host=None, mysql_user=None,
                               mysql_password=None, mysql_databases=None, output_file='dump.sql'):
    logging.debug('dump_mysql_to_file_via_ssh')

    ssh = paramiko.SSHClient()
    ssh.set_missing_host_key_policy(paramiko.AutoAddPolicy())
    ssh.connect(hostname=ssh_host, username=ssh_user, password=ssh_password)

    stdin, stdout, stderr = ssh.exec_command('mysqldump --host={mysql_host} -u {mysql_user} -p{mysql_password} --databases {mysql_databases}'.format(
        mysql_host=mysql_host,
        mysql_user=mysql_user,
        mysql_password=mysql_password,
        mysql_databases=mysql_databases
    ))

    logging.info('Begin writing to file {}'.format(output_file))
    file = open(output_file, 'wb')

    # Wait for the command to terminate
    while not stdout.channel.exit_status_ready():
        # Only print data if there is data to read in the channel
        if stdout.channel.recv_ready():
            rl, wl, xl = select.select([stdout.channel], [], [], 0.0)
            if len(rl) > 0:
                # Print data from stdout
                r = stdout.channel.recv(1024)
                file.write(str(r))
    file.close()
    logging.info('Done writing to file.')
    ssh.close()

if __name__ == '__main__':
    dump_mysql_to_file_via_ssh(
        ssh_host='ssh.example.com',
        ssh_user='',
        ssh_password='',
        mysql_host='',
        mysql_user='',
        mysql_password='',
        mysql_databases='',
        output_file='sebastiannilsson.com.sql'
        )
    sftp_backup(ssh_host='ssh.example.com', ssh_username='', ssh_password='', source_directory='', local_directory='')
Tagged with:

Algorithmic trading with Python

I have been experimenting with algorithmic trading for a couple of weeks. Zipline is a Python library for backtesting trading algorithms and I would like to share one of the algorithms I made.

import talib
from zipline.api import record, order_target, history, add_history
import dateutil
import logging
from zipline.utils.factory import load_from_yahoo
from zipline.finance.slippage import FixedSlippage
from zipline.algorithm import TradingAlgorithm
from zipline.finance import commission

logging.basicConfig(level=logging.DEBUG)


# initialize algorithm
def initialize(context):
    logging.debug('enter initialize')
    context.set_slippage(FixedSlippage())
    context.set_commission(commission.PerTrade(cost=5))

    context.LOW_RSI = initialize.low_RSI
    context.HIGH_RSI = initialize.high_RSI
    context.rsi_window = initialize.rsi_window
    add_history(context.rsi_window, '1d', 'price')
    context.i = 0
    context.invested = False

# default parameters for algorithm
initialize.rsi_window = 15
initialize.low_RSI = 30
initialize.high_RSI = 70


# Will be called on every trade event for the securities you specify.
def handle_data(context, data):
    logging.debug('enter handle_data')
    context.i += 1
    if context.i < context.rsi_window:
        return

    # get the last RSI value
    prices = history(context.rsi_window, '1d', 'price')
    sec_rsi = talib.RSI(
        prices[context.security].values,
        timeperiod=context.rsi_window - 1)

    # buy and sell flags
    buy = False
    sell = False

    if sec_rsi[-1] < context.LOW_RSI and not context.invested:
        # RSI under 30 indicates oversold, time to buy
        order_target(context.security, 1000)
        logging.debug('Buying {}'.format(context.security))
        context.invested = True
        buy = True

    elif sec_rsi[-1] > context.HIGH_RSI and context.invested:
        # RSI over 70 indicates overbought, sell everything
        order_target(context.security, 0)
        logging.debug('Selling {}'.format(context.security))
        context.invested = False
        sell = True

    # record data for each time increment
    record(secRSI=sec_rsi[-1],
           price=data[context.security].price,
           buy=buy,
           sell=sell)
    logging.info(context.portfolio.cash)


def run_algorithm(
        security='AAPL',
        start_date='20100101',
        end_date='20150101',
        initial_cash=100000,
        rsi_window=15,
        low_RSI=30,
        high_RSI=70):
    logging.debug('run_algorithm begin')
    # dates
    start = dateutil.parser.parse(start_date)
    end = dateutil.parser.parse(end_date)

    # get data from yahoo
    data = load_from_yahoo(stocks=[security], indexes={}, start=start, end=end)
    logging.debug('done loading from yahoo. {} {} {}'.format(
        security, start_date, end_date))

    # create and run algorithm
    algo = TradingAlgorithm(
        initialize=initialize,
        handle_data=handle_data,
        capital_base=initial_cash)
    algo.security = security
    initialize.low_RSI = low_RSI
    initialize.high_RSI = high_RSI
    initialize.rsi_window = rsi_window
    logging.debug('starting to run algo...')
    results = algo.run(data).dropna()
    logging.debug('done running algo')
    return results


if __name__ == '__main__':
    import matplotlib.pyplot as plt

    # run algorithm and get results
    results = run_algorithm(
        security='AAPL',
        start_date='20100101',
        end_date='20150101',
        initial_cash=100000,
        rsi_window=15,
        low_RSI=30,
        high_RSI=70)

    # get s&p500 and nasdaq indexes
    index_data = load_from_yahoo(
        stocks=['^gspc', '^ixic'],
        indexes={},
        start=results.index[0],
        end=results.index[-1])

    # portfolio value, stock holdings and S&P 500 index
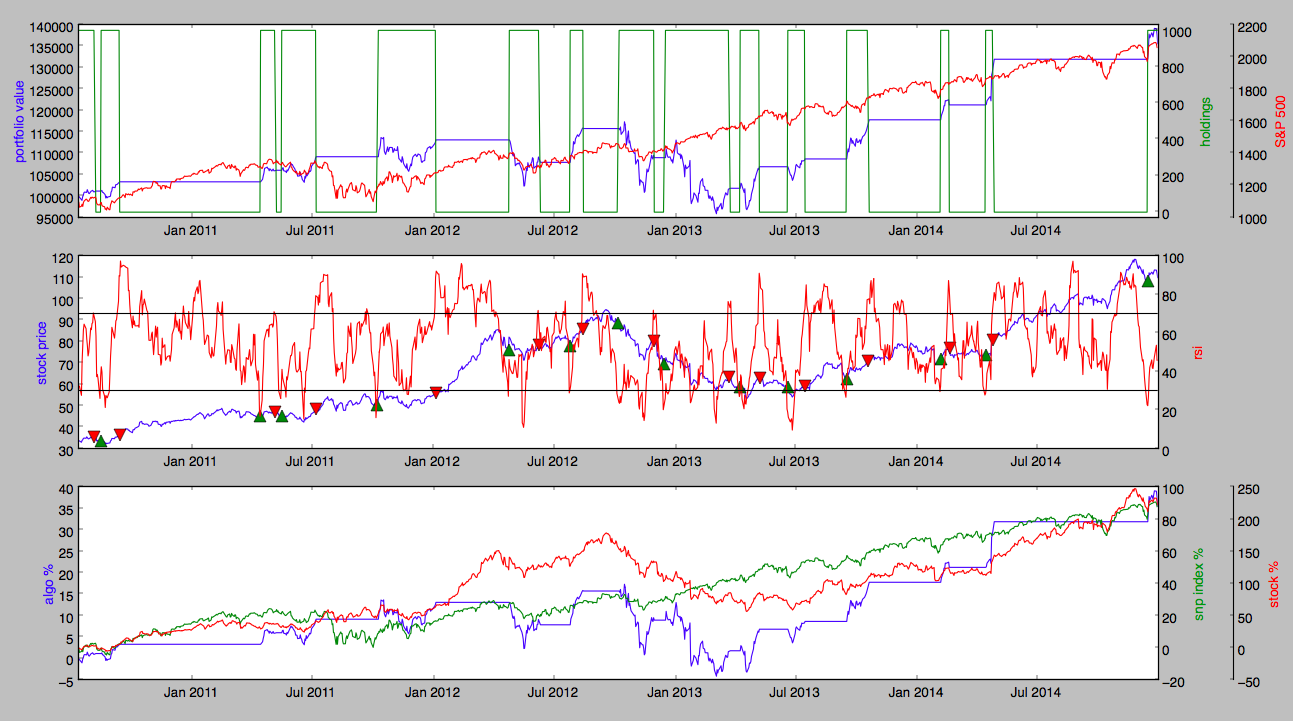
    fig = plt.figure(figsize=(12, 6))
    ax11 = fig.add_subplot(311)
    ax12, ax13 = ax11.twinx(), ax11.twinx()
    ax13.spines['right'].set_position(('axes', 1.07))
    ax11.set_ylabel('portfolio value', color='blue')
    ax12.set_ylabel('holdings', color='green')
    ax13.set_ylabel('S&P 500', color='red')

    # portfolio value
    ax11.plot(results.index, results.portfolio_value, color='blue')

    # holdings (number of stocks owned)
    holdings = [0 if t == [] else t[0]['amount'] for t in results.positions]
    ax12.plot(results.index, holdings, color='green')
    ax12.set_ylim([min(holdings) - 30, max(holdings) + 30])

    # index
    ax13.plot(index_data.index, index_data['^gspc'], color='red')

    # algo visualization
    ax21 = fig.add_subplot(312)
    ax21.set_ylabel('stock price', color='blue')
    ax22 = ax21.twinx()
    ax22.set_ylabel('rsi', color='red')

    # stock
    ax21.plot(results.index, results.price, color='blue')

    # add sell and buy flags on top of stock price
    ax21.plot(
        results.ix[results.buy].index,
        results.price[results.buy],
        '^',
        markersize=10,
        color='green')
    ax21.plot(
        results.ix[results.sell].index,
        results.price[results.sell],
        'v',
        markersize=10,
        color='red')

    # rsi value
    ax22.plot(results.index, results.secRSI, color='red')
    # add lines to show under- and over value indicator
    ax22.plot([results.index[0], results.index[-1]], [30, 30], 'k-')
    ax22.plot([results.index[0], results.index[-1]], [70, 70], 'k-')

    # portfolio value, stock value and index in percentage
    ax31 = fig.add_subplot(313)
    ax32, ax33 = ax31.twinx(), ax31.twinx()  # share x for other plots
    ax31.set_ylabel('algo %', color='blue')
    ax32.set_ylabel('snp index %', color='green')
    ax33.set_ylabel('stock %', color='red')
    ax33.spines['right'].set_position(('axes', 1.07))

    # portfolio value
    ax31.plot(
        results.index,
        results.portfolio_value / results.portfolio_value[0] * 100 - 100,
        color='blue')

    # index
    ax32.plot(
        index_data.index,
        index_data['^gspc'] / index_data['^gspc'][0] * 100 - 100,
        color='green')

    # stock value
    ax33.plot(
        results.index,
        results.price /
        results.price[0] * 100 - 100,
        color='red')

    plt.show()

If you get it working you should see a plot similar to this one:
Skärmavbild 2015-04-04 kl. 22.20.20

If you are observant, it is easy to see that the performance of this algorithm is not good enough to be used on a real portfolio, and it is more of a test.

Links:

Tagged with: ,

Rapidly building a python gui application

One of my favorite scripting languages is python, and for a couple of good reasons, and the most important reason rapid development from idea to a working application. I will show this with a example by building a simple python app with a gui and then make it ready for deployment by creating an executable file.

Prerequisites:

  • Python 2.7 (and not 3.* since wxpython support is still under development)
  • wxpython will handle the gui stuff.
  • wxformbuilder is a gui editor that can generate wxpython code for us. In most cases this is faster than writing this code by hand.
  • pyinstaller to freeze the application (create an .exe on Windows or a .app on osx)
  • A text editor (sublime, notepad++, pycharm or anything similar)
  • Good enough python skills to know how to install new modules. I will not explain how to install all the modules listed above.

1. Building the gui

Start wxformbuilder. By default a new project is already open. Set filename to gui and code generation to Python:

0 wxformbuilder 6 set project prop

Add a frame:

1 wxformbuilder form1.1 set form name

Add a wxBoxSizer. This will hold our gui components and stack them vertically:

2 wxboxsizer

Add a text and a button:

3 wxbitmapbutton

Name them m_text and m_button (or whatever):

5 set prop text4 set prop button

Bind an event for button clicks since we want to do something when the user clicks the button:

4.1 set prop button event

Save the wxformbulder project to a new folder. Then click Generate code from the menu.

7 generate code

The content of your project folder should contain the wxformbuilder project file and the generated file:

8 files

2. Integrate gui into Python code

The idea is to import the gui file, extend the functions and override the events. Lets use this code as a skeleton:

import wx
import gui

# Extend the gui with some new functionality
class MyFrame(gui.MainFrame):
    def __init__(self, parent, title):
        gui.MainFrame.__init__(self, parent)

    # this is the event we defined in wxformbuilder, and now override from gui.py
    def on_button_click_event(self, event):
        print('on_button_click_event')

# Create wxpython app
class MyApp(wx.App):
    def OnInit(self):
        self.frame = MyFrame(None, "Hello Wxpython")
        self.SetTopWindow(self.frame)
        self.frame.Show(True)
        print("wxApp created.")

        return True

if __name__ == "__main__":
    app = MyApp(redirect=False) # do not redirect stdout to the gui
    app.MainLoop() # render gui continuously

Try running the code and you should see something like this:
9 running the skeleton

Now lets modify it to do something when user clicks the button:

import wx
import gui

# Extend the gui with some new functionality
class MyFrame(gui.MainFrame):
    def __init__(self, parent, title):
        gui.MainFrame.__init__(self, parent)

    # this is the event we defined in wxformbuilder, and now override from gui.py
    def on_button_click_event(self, event):
        print('on_button_click_event')

# Create wxpython app
class MyApp(wx.App):
    def OnInit(self):
        self.frame = MyFrame(None, "Hello Wxpython")
        self.SetTopWindow(self.frame)
        self.frame.Show(True)
        print("wxApp created.")

        return True

if __name__ == "__main__":
    app = MyApp(redirect=False) # do not redirect stdout to the gui
    app.MainLoop() # render gui continuously

Now a button click should trigger the event and print something to the console:

10 running the finnished code

Building an executable (freezing) the application

Since Python is a script language we (usually) don't compile it into machine code. But if you want to deploy your application or send it user which do not have Python installed, you can freeze your application into an executable file (.exe in windows or .app in OS X). There are multiple tools to do this but I choose to use pyInstaller since it works on both windows and OS X, and can pack your application into a single executable instead of multiple files.

In principle, using pyInstaller is quite straight forward. From the terminal (OS X) or command prompt (windows), you can use this command to build your file:
# pyinstaller -y --windowed --onefile --icon=icon/banana.icns --name="' + filename + '" hello_wxpython.py

Build executable from a Python script

I usually use a custom script when I want to build an executable. You can download the pyinstaller_helper module from the github link at the end.

import pyinstaller_helper

pyinstaller_helper.build({
    'script': 'hello_wxpython_tutorial.py',
    'application_name': 'hello wxpython',
    'version': '1.0.0.1',
    'company_name': u'Example',
    'product_name': u'Hello wxPython',
    'internal_name': 'product_name',
    'original_filename': u'Hello wxPython',
    'file_description': 'Lorem ipsum.',
    'legal_copyright': 'your@email.com',
    'legal_trademark': ''
})

Running build_executable.py on OS X will generate an .app file, and on windows a .exe file. The script will create an executable that is specific for that platform, so for me it looks like this:

11 dist code

Download the code

This tutorial is on github.

Build a GUI in python using the Qt framework

If you would like to learn how to build a GUI using the Qt framework instead of Wxpython then try this sponsored link:

https://www.udemy.com/python-gui-programming/

Use the coupon code: sebastiannilsson.com and if you are one of the first 50 you get it for free.

Tagged with: ,